
Finished dimensions: 55″ by 55″ (shrunk)
Tutorial!
OK, so normally I don’t include tutorials in my posts, largely because I can’t retrace exactly what I’ve done. I am a bit of a chaotic quilter: the finished quilt is not usually what I originally set out to create, despite my intentions I don’t do well with accurately tracking my time and supplies, and I like to try new things so repeating a quilt top is not usually my thing.
But this quilt was super simple and the finished product is STUNNING! I highly recommend making this pattern. (Writing this tutorial was more tedious than making this quilt!)
Quilt overview:
Fabric needs: about 7 yards
- Quilt top: 3 – 3 1/2 yards (I used about 3 1/4 yards)
- Quilt backing: 3 yards (there will be leftovers, but I needed 3 yards of the same fabric to easily make the back)
- Binding: 1/2 yard
Timing: about 30 hours (though this could be done much, MUCH quicker by using jelly rolls and not starching your fabrics)
- Selecting fabrics & designing: 2 hours
- Starching & pressing: 3 hours (you absolutely can skip this step, but I find it easier to work with starched fabrics)
- Cutting: 3 hours
- Piecing: 8 hours
- Quilt stitching: 7 hours (including hand basting)
- Binding & finishing: 6 hours
1. Pick your fabrics
You can use scraps, yardage, jelly rolls, or a combination of all three.
I chose fabrics that were largely in the green-blue-purple spectrum with a few yellow accents, but you can choose any fabrics that you like together.
I also chose a variety of patterns on the fabric such as large florals, small florals, modern styles, blenders, etc. I liked having a mix of busier fabrics and more solids, but again, pick what looks good to you.

The fabrics I chose for the quilt top
2. Cut the fabric into 2.5″ strips
I used the standard jelly roll width to make things super easy. I was using yardage and so I cut a total of 46 strips from my different fabrics (anywhere from 1 – 3 strips from each fabric, depending on what I was feeling). You’d want about the same number if you are using jelly rolls.
3. Cut the strips into different lengths
You can skip this step if you are using scraps!
I didn’t want the strips to be uniform lengths, so I cut each 42″ strip into anywhere from 2 – 5 pieces, being sure to vary the lengths.
Note that if you cut your strips into smaller pieces, you will likely need to cut extra strips to account for the length lost to the seams. Same for if you are using scraps.
4. Randomly sew the strips end-to-end
Take your smaller strip pieces and randomly sew them together, then press the seams open. I used chain piecing to get through this step relatively quickly: it only took about 2 hours to piece and press the seams.
At the end of it, I ended up with one veeeerrryy long strip of about 1,850″ or 51 yards. You’ll need about the same length.

Long roll is long
5. Cut long roll into 21 strips
If your long roll is about 1,850″ long, then you will want to cut it into roughly 88″ segments. You want 21 strips that are roughly the same length.
6. Sew the 21 strips together along the long edges to make a rectangle
Again, I just randomly picked up strips and sewed them together, so sometimes I ended up with spots where the same fabric was “touching”. I like the effect of this, but if you don’t, you can always rotate the strips and/or plan them out a little more before you start stitching.

Rectangle of strips
7. Square up Rectangle, then cut into 8 triangles
Square off the top and bottom ends of the Rectangle.
Then, cut the quilt in half length-wise so you have two pieces that are roughly 42-44″ square. Then, cut each of these squares into half diagonally.
Originally this is where I planned to stop cutting, but when I put the 4 triangles back together (with the right angles pointing in to the middle), I didn’t like how it looked:

Ick. this looked better as a rectangle
So then I thought, what if I cut the triangles in half, to make 8 triangles instead of 4? It looked waaaaay better. Huge improvement:
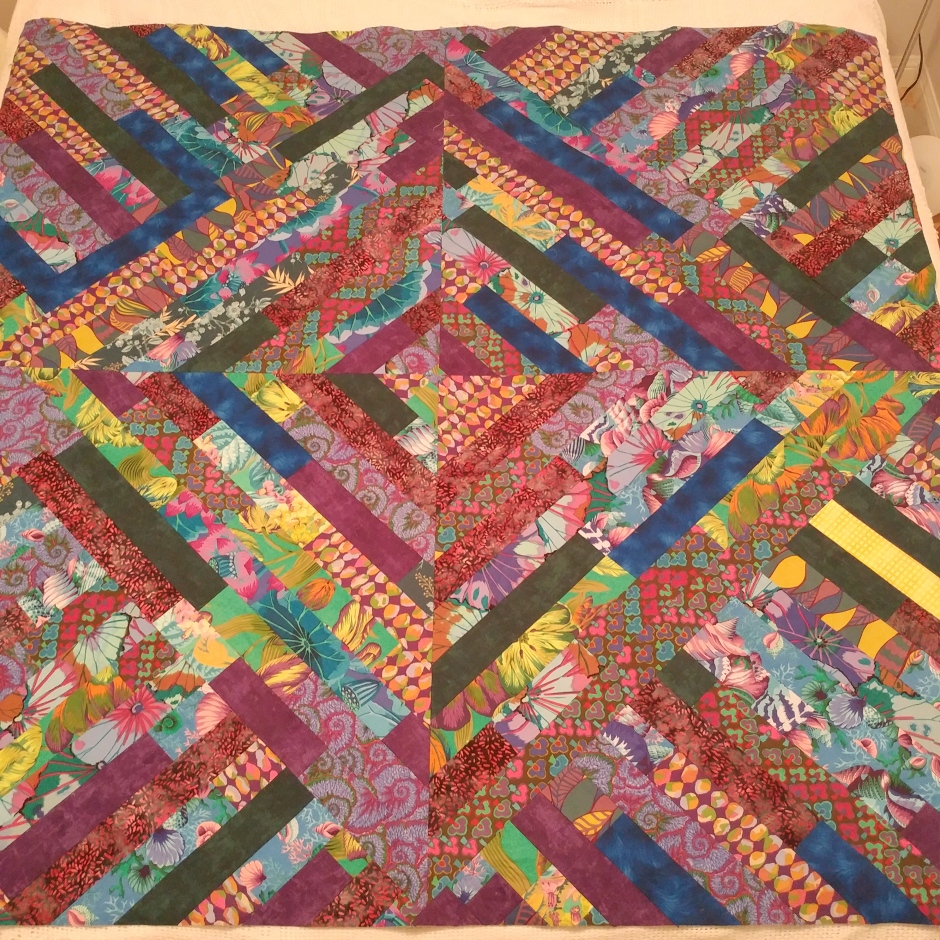
Play around with the positioning of the different triangles until you find a configuration you like. For me, I liked having the diamond effect created by the configuration above, but with different fabrics, I might prefer something different.
8. Sew the 8 triangles back together
Pretty straight forward.
9. Baste, quilt, and bind!
Again, not going to get into this step, use whatever methods you prefer to use to finish your quilt.
Ta-da!

Did you try out this tutorial?
Let me know how it went by leaving a comment!
